In the first of a series, Alan Cooke looks at a range of software tools to help with your presentation design.
Do you sometimes need to capture your screen? Or perhaps just a small section of an image?
PowerPoint has the necessary tools to capture your desktop and crop it to fit a slide. Once you have captured your desktop using the ‘Print Screen’ button you can use the Ctrl+V key combination to paste the capture into PowerPoint. What you paste will be the dimensions/resolution of your monitor and will be way too big for the slide without editing. PPT 2010 comes with some neat ways to make life easier.
Once you have selected the captured image, the ‘Picture Tools’ menu option is displayed along with a set of cropping options, seen here on the right.

Figure 1 Picture tools with Crop options on the right
Using the ‘Crop’ tools you can make use of pre-sets such as fill, fit, set dimensions as well as ‘user drag to crop’ .
![]()
Before 2010 came along, though, one had to make use of third-party software, of which MWSnap came to be my favoured utility.

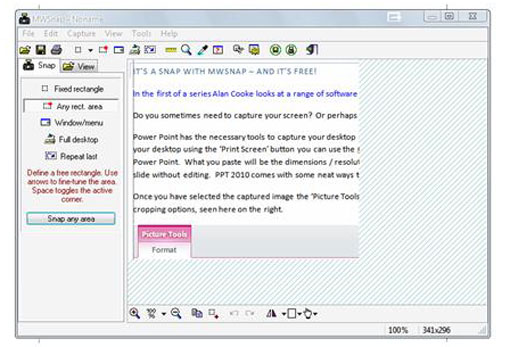
Figure 2 MWSnap main screen
The Snap tab has the following capture/snap options:
- Fixed rectangle. This offers a number of pre-set sizes of rectangle. You can set your own.
- Any rect. area. Use this to drag a rectangle around any part of the screen, hit enter and you have it. When you ‘snap’ using this option you might need to switch corners for the drag. All you do is hit the space bar and the drag handle will jump to the diagonally opposite corner.
- Window/menu is very clever. Click ‘Window/menu’ and move the mouse around the screen. Watch carefully and you will see the marching ants select a window or menu automatically. Again, hit enter to capture. Try it on the taskbar or the toolbar of an open application.
- Full desktop is pretty obvious. As is Repeat last.
After you have snapped a clip using one of these methods the options at the bottom of the snap window are activated.

Figure 3 Tools to manipulate snapped clip
MWSnap affords a convenient and slick way to capture al, or parts, of your screen. All your ‘clips’ can be saved in a folder of your choice for use in future presentations or other applications.
A couple of tips regarding the preference settings:
I prefer to have MWSnap load and wait in the system tray so I minimise to the tray on start-up. It’s a good idea to keep the ‘hot key’ conflict option ‘on’ to alert you to possible key combinations that might conflict with additional applications you might have open as you work.
![]()
On the ‘Snapping’ tab I have all the boxes checked apart from ‘Auto print snapped image’. ‘Auto-saving’ has two basic settings. You can choose to Auto save in various formats such as ‘jpg’, ‘png’ etc, as well as to a particular folder. The other option allows you to choose to automatically create filenames incremented by number or to prompt you for a filename. I prefer the latter as I can then describe the snap, making it easier to identify it later.

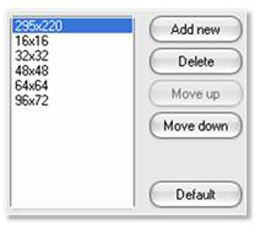
Figure 4 MWSnap Fixed size options
The last tab worthy of note is ‘Fixed sizes’.
This option allows you to pre-define set sizes. Your PowerPoint presentation slides may require images of a specific size. All that is required is to use the ‘Any size’ option and take your snap. Now use the ‘Add fixed size’ under ‘Capture’ in the menu and the size is added to your pre-sets. If you only need a particular size for the current session you can use the ‘Repeat last’ option mentioned earlier.
That’s it! A great utility when preparing your PowerPoint presentation
The author’s description
“MWSnap is a small yet powerful Windows program for snapping (capturing) images from selected parts of the screen.
Current version is capable of capturing the whole desktop, a highlighted window, an active menu, a control, or a fixed or free rectangular part of the screen. MWSnap handles five most popular graphics formats and contains several graphical tools: a zoom, a ruler, a color picker and a window spy. It can be also used as a fast picture viewer or converter.”
You can download MWSnap freeware at http://www.mirekw.com/winfreeware/files/MWSnap300.exe
